Introduction
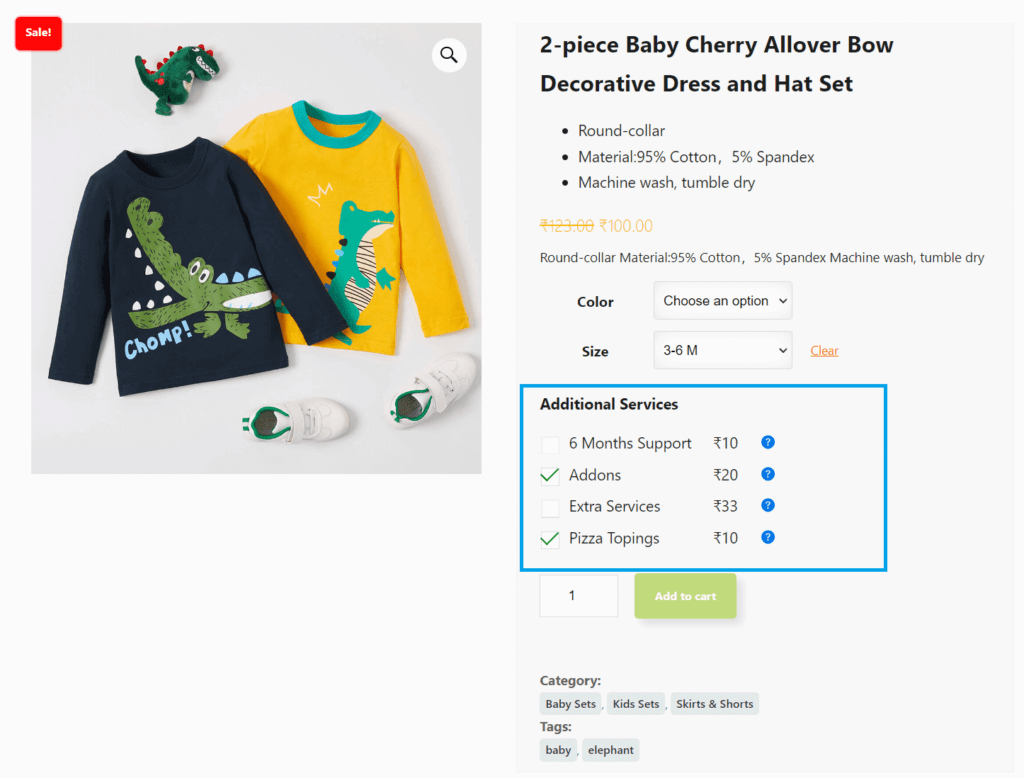
Custom Checkbox Ultimate for WooCommerce is a powerful WooCommerce extension that allows store owners to offer additional services and charges to customers through customizable checkboxes on product pages. Enhance your product offerings by enabling customers to select extra features, services, or options, seamlessly integrating additional costs into their purchases.
Key Features
Customizable Checkbox Options: Easily add multiple checkbox fields to your WooCommerce product pages for additional services.
Dynamic Pricing: Automatically adjust product prices based on selected additional services.
Service Descriptions: Provide detailed descriptions for each additional service using tooltips for better customer understanding.
Admin-Friendly Interface: Manage and configure additional services directly from the product edit screen with an intuitive meta box.
Order Integration: Ensure that selected services and their costs are accurately reflected in the cart, checkout, and order details.
Flexible Field Management: Add as many custom service fields as needed with ease.
Plugin Installation Guide
Follow these steps to install the Insertcart Custom WooCommerce Checkbox Ultimate plugin on your WordPress site:
- Download the Plugin:
- Download the plugin ZIP file from your store.
- Upload the Plugin to WordPress:
- Navigate to your WordPress dashboard.
- Go to
Plugins > Add New. - Click on
Upload Plugin. - Choose the downloaded plugin ZIP file and click
Install Now.
- Activate the Plugin:
- After installation, click
Activate Plugin.
- After installation, click
- Verify WooCommerce:
- Ensure that the WooCommerce plugin is installed and activated. If WooCommerce is not active, you will see an admin notice indicating that this plugin requires WooCommerce to function.
Download Pro file from My Account – Download section http://www.insertcart.com/my-account/ (If you are having any problem in download then contact us) After downloading upload the main file your-file-name.zip via FTP or WordPress upload. As FTP software, you can use FileZilla or any other FTP client.
How to setup & use plugin
Adding Custom Services to Products
- Edit a Product:
- Go to
Productsin your WordPress dashboard. - Click on an existing product or create a new one.
- Go to
- Custom Services Meta Box:
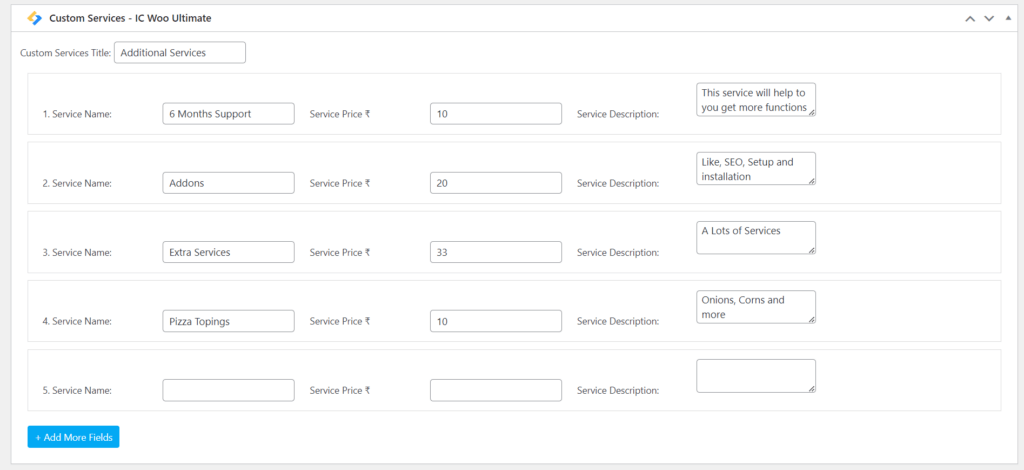
- In the product edit page, scroll down to the
Custom Servicesmeta box. - You will see fields to add up to 10 custom services.
- In the product edit page, scroll down to the
- Adding Service Names and Prices:
- Fill in the service names and prices in the provided fields.
- The first 5 fields are displayed by default. Use the
Add More Fieldsbutton to add additional fields. - Service Description Help to fill the tooltip for users
- Save Product:
- After adding the services, click
UpdateorPublishto save your product.
- After adding the services, click


Frequently Asked Questions
1. Does this plugin work with all WooCommerce themes?
Yes, the plugin is designed to be compatible with most WooCommerce-compatible themes. However, styling may vary based on your theme. You can use custom CSS to adjust the appearance as needed.
2. Can I add more than five custom service fields?
Absolutely! While the plugin initializes with five fields by default, you can add as many additional service fields as required using the + Add More Fields button in the meta box.
3. Is it possible to set different prices for different user roles?
By default, the plugin does not support role-based pricing. However, with custom development or additional extensions, this functionality can be achieved.
4. How are the additional service costs handled during checkout?
Selected additional services are added to the cart item data, ensuring that the total price reflects the added costs. These details are visible in the cart, checkout, and order summaries.
5. What happens if WooCommerce is deactivated?
If WooCommerce is not active, the plugin will display an admin notice prompting you to activate WooCommerce, as it is a required dependency.

