Your cart is currently empty!
Angel Broking is a big broker that provides trading platforms for different types of trading some user uses their applications some their web interface and some advanced user uses Angel one smart API for their custom algorithms and multiple client order placements.
Today we will provide you with complete code for Angel one smart API Python code. Video for tutorial in Hindi at bottom
1. Open Angel One Account
To do so you need to have Angel one account first you can register from below link or you already have account then there is no need.
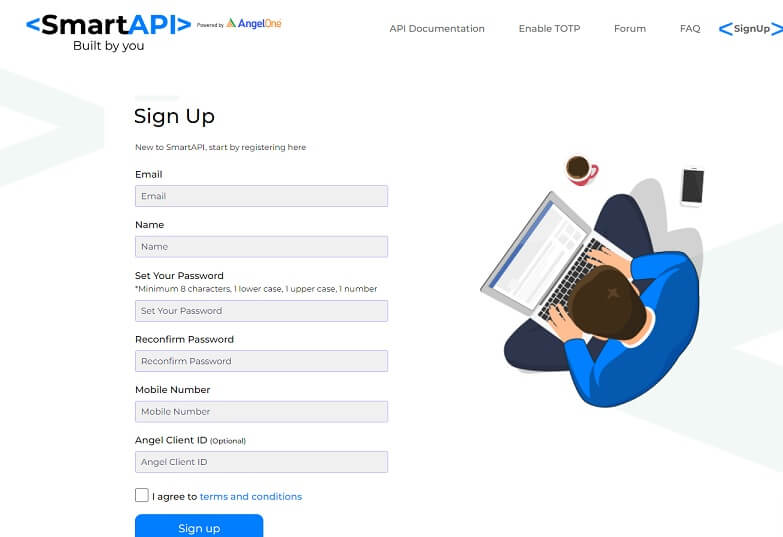
2. Register For Angel One SmartAPI
Follow the link below and register yourself for smart API
https://smartapi.angelbroking.com/signup
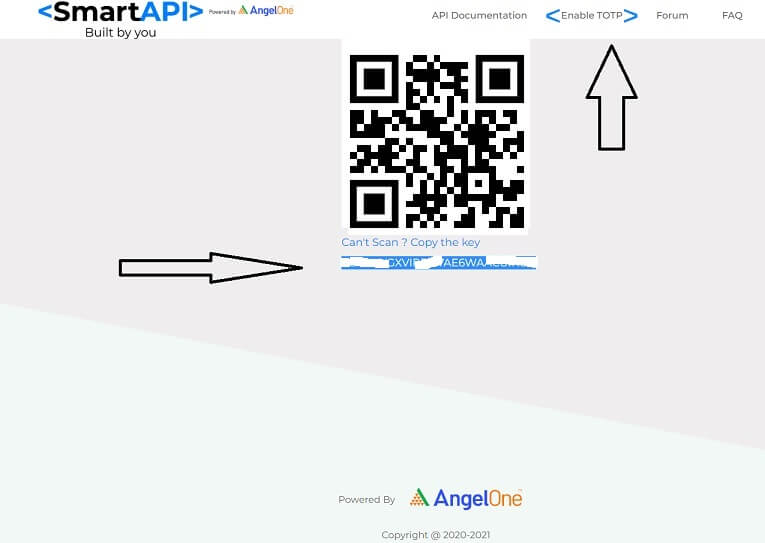
3. Enable TOTP from the top menu and copy
4. Create An app to get API from smartapi in angel broking.
Go to My profile > My API > Create an app
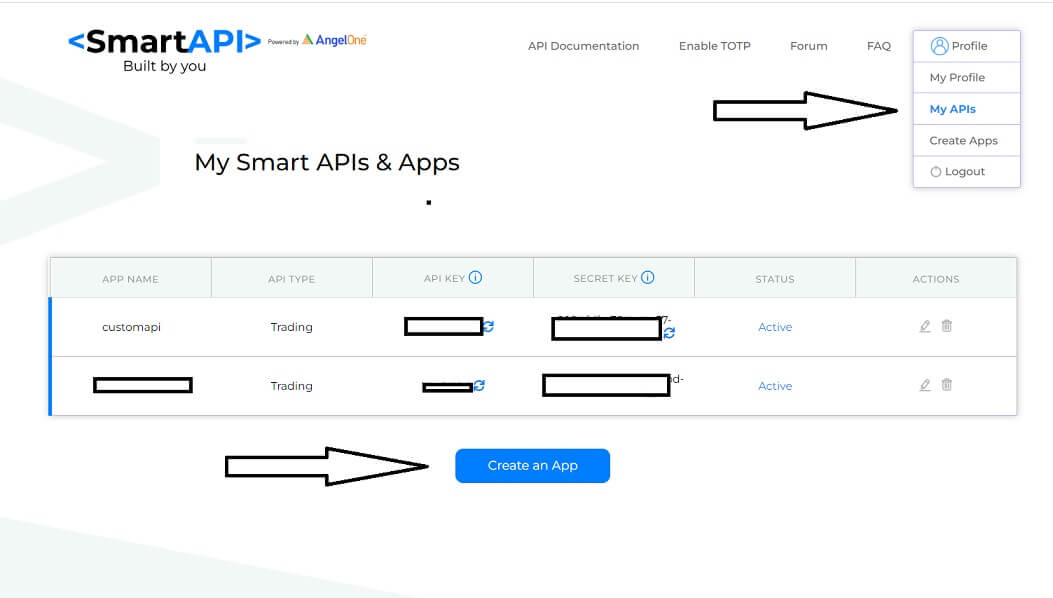
Now here you need to fill in information Like
- Select: Trading
- App name: anything you want
- URL : https://smartapi.angelbroking.com/
- POST URL: https://smartapi.angelbroking.com/
- Angel Client ID : Optional
5. Download your Favorite python code editor or use VS Code
Download python
https://www.python.org/downloads/
Download VS Code
https://code.visualstudio.com/
In VS code Python will not work directly you need to install Python extension after installing the extension restart your VS code sometimes you need to restart PC.
6. Now Open VS Code terminal in your directory and run these Python commands.
pip install smartapi-python
pip install websocket-client
if the above commands do not work properly and give you errors like
pip : The term 'pip' is not recognized as the name of a cmdlet, function, script file, or operable program. Check the spelling of the name, or if a path was included,
verify that the path is correct and try again.
Then try like this
py -m pip install smartapi-python
Just use py -m in the start of your code.
7. To generate TOTP automatically you need to install pyotp
py -m pip install pyotp
Now we are ready to implement Angel One Smart API code.
8. Now we need 2 files 1 for order and 1 for credentials to create 2 files naming orders.py and credential.py
Here is the Order file code
from smartapi import SmartConnect
import pandas as pd
from datetime import datetime
import credentials
import requests
import numpy as np
import pyotp


myotp =  pyotp.TOTP(credentials.CD).now()

def place_order(token,symbol,qty,exch_seg,buy_sell,ordertype,price):
    try:
        orderparams = {
            "variety": "NORMAL",
            "tradingsymbol": symbol,
            "symboltoken": token,
            "transactiontype": buy_sell,
            "exchange": exch_seg,
            "ordertype": ordertype,
            "producttype": "INTRADAY",
            "duration": "DAY",
            "price": price,
            "squareoff": "0",
            "stoploss": "0",
            "quantity": qty
            }
        orderId=obj.placeOrder(orderparams)
        print("The order id is: {}".format(orderId))
    except Exception as e:
        print("Order placement failed: {}".format(e.message))

def intializeSymbolTokenMap():
    url = 'https://margincalculator.angelbroking.com/OpenAPI_File/files/OpenAPIScripMaster.json'
    d = requests.get(url).json()
    global token_df
    token_df = pd.DataFrame.from_dict(d)
    token_df['expiry'] = pd.to_datetime(token_df['expiry'])
    token_df = token_df.astype({'strike': float})
    credentials.TOKEN_MAP = token_df

def getTokenInfo (exch_seg, instrumenttype,symbol,strike_price,pe_ce):
    df = credentials.TOKEN_MAP
    strike_price = strike_price*100
    if exch_seg == 'NSE':
        eq_df = df[(df['exch_seg'] == 'NSE') & (df['symbol'].str.contains('EQ')) ]
        return eq_df[eq_df['name'] == symbol]
    elif exch_seg == 'NFO' and ((instrumenttype == 'FUTSTK') or (instrumenttype == 'FUTIDX')):
        return df[(df['exch_seg'] == 'NFO') & (df['instrumenttype'] == instrumenttype) & (df['name'] == symbol)].sort_values(by=['expiry'])
    elif exch_seg == 'NFO' and (instrumenttype == 'OPTSTK' or instrumenttype == 'OPTIDX'):
        return df[(df['exch_seg'] == 'NFO') & (df['instrumenttype'] == instrumenttype) & (df['name'] == symbol) & (df['strike'] == strike_price) & (df['symbol'].str.endswith(pe_ce))].sort_values(by=['expiry'])


if __name__ == '__main__':
    intializeSymbolTokenMap()

obj=SmartConnect(api_key=credentials.API_KEY)
data = obj.generateSession(credentials.USER_NAME,credentials.PWD,myotp)
refreshToken= data['data']['refreshToken']
feedToken=obj.getfeedToken()
credentials.FEED_TOKEN = feedToken

def userin():
    userProfile= obj.getProfile(refreshToken)
    userProfile.place(x=280, y=250)
    print(userProfile)

tokenInfo = getTokenInfo('NFO','OPTIDX','NIFTY',14900,'PE').iloc[0]
#print(tokenInfo)
symbol  = tokenInfo['symbol']
token = tokenInfo['token']
lot = '100'

#lot = int(tokenInfo['lotsize'])
print(symbol, token, lot)

place_order(token,symbol,lot,'NFO','BUY','MARKET',200)
9. Now create a credentials.py file and copy your data their
USER_NAME = 's123456'
PWD = '1234'
API_KEY = 'AKJHGKDJsak'
TOTP = '123456'
CD = 'ABCDEFGHIJKLMNOP'
FEED_TOKEN = None
TOKEN_MAP = None
10. Sometimes python code doesn’t show and an error it could be because you installed python in your PC user which contains space in their name. Like c:/users/sandeep kumar/myfolder
Download Files Here
Comments
Grabber Pro
Original price was: $59.$39Current price is: $39.Custom WooCommerce Checkbox Ultimate
Original price was: $39.$19Current price is: $19.Android App for Your Website
Original price was: $49.$35Current price is: $35.Abnomize Pro
Original price was: $30.$24Current price is: $24.Medical Portfolio Pro
Original price was: $31.$24Current price is: $24.
Latest Posts
- How to Create a PHP Remote File Downloader with Live Progress Bar
- How to Connect AWS CloudFront URL with a Cloudflare Subdomain

- Android Developer Interview Questions Categorized by Topic

- When Data Must be Sanitized, Escaped, and Validated in WordPress

- Alternative to WordPress for High Traffic News Websites: Node.js & Other Scalable Solutions




Leave a Reply